Saturday, 15 December 2012

Part 4


Last card, you'll be glad to know!  I know I was.

This time I used Crafter's Companion Mulberry Wood CD rom and the card format is similar to the second card but I put tags inside some of the quarter pages.

Here is the front page, using papers and decoupage from the CD.

 
I have made a tag to go on the first insert - I have alternated the colours between pink and pale teal card stock.  On the second quarter page I have used toppers stuck straight onto the  paper.


Again I have made a tag, and used a mock film strip from the CD for the other side.


This time I have kept the next 2 pages whole, without dividing it into quarters.  I have used decoupage from the CD and  glitter.


Then I have gone back to the tag and pocket and flat toppers.


And that's the end.  
 
They did take quite a while, but I was pleased with them and so was my hairdresser.
 
Thank you for looking.
 
x


Thursday, 13 December 2012

Part 3


Hello

As promised here is the third of my commissioned cards.


I have done this card before for my grand-daughter in Australia, but it proved so popular I thought I'd do it again.  The card is a double tri-fold card, similar to the first card I showed you.  I am using Crafter's Companion Jayne Nestorenko CD for the decoupage and papers and her various Christmas Cute Companions' stamps. 
 
 
This is the inside picture on the front page, decoupaged and glittered.


This is the inside picture on the back page, also decoupaged and glittered.


And here are the two insides.  I have used the Memory Box Frostyville Border die, as in my first book, but in silver this time.


This is the inside panel of the card. 

Part 4 to follow!

I hope you like this book.  Thank you for looking. x


Tuesday, 11 December 2012

Part 2

Here is the second commissioned card, as promised.

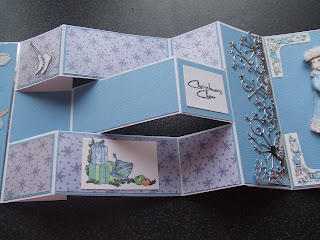
This card stye came about by accident.  I thought of doing a 'K' style card with an opening inside.  I scored the first card in half, in the normal way.  The second card I scored in half and then in half again, making a concertina.  Instead of cutting a shape into the second card, I left it as it was and stuck it into the first card.  I then did it all over again and stuck the two cards together, making a sort of folder, added a bit of ribbon and there was another book.  I've haven't explained it very well I'm afraid, but hope you can see what I've done.
 

I've used the Crafter's Companion Snowman Cardmaking Kit with their decoupage, rub ons and toppers on all the pages.  Also using their Co-ordination card stock in two shades of teal colours.


Hopefully you can see the first quarter is stuck to the main part of the card, the second quarter is folded in a valley, the third quarter is a mountain, etc.


 and the last quarter is a valley fold.
 
 
This is now the second concertina card with the back and front of the main card stuck together. 
 

And this is the back of the book, using another Crafter's Companion insert from the Snowman CD.
 

Part 3 will be along later!!

Thank you for looking.   x

Friday, 7 December 2012

Special commissioned cards

I go regularly to the hairdressers (not that you'd be able to guess!) and last year my hairdresser happened to see some of my cards I had made for work.  She loved them and bought a couple from me, which was very flattering.  Anyway, when I went to her a couple of months ago she asked me if I would make 'special' cards for her four grandchildren, three girls and a boy,  in Australia.  She didn't have any special idea of what she wanted and the children were 9, 8, 4 and 2!
 
I have to say once I got home I wished I hadn't agreed.  I'm OK at following patterns, with my own additions, but when I have to decide on everything, I literally panic!  Eventually after several sleepless nights and many alterations on the way, here is what I came up with:

This is the first card - I'll put the others on separate blogs, otherwise it will be a very long blog!
 

I decided to make two tri-fold cards joined together to make a book-style card, tied with ribbon.  I used My Mind's Eye papers from the Merry Days of Christmas set and the die cut Christmas toppers from Kanban.  These are the front pages of the card.


This is inside the front page, behind Father Christmas - the snowman, little mouse and decorations are from Jane Nestorenko's Cute Companions' stamps which I coloured in using Promarkers.


This is the back page of the card, behind the Snowman, again using Jane Nestorenko's Cute Companions' stamps of the Christmas tree, glittered and decorated, and the mouse balancing on the parcels.


Apologies, this is quite a dark picture. This is as you pull the card completely open - I've used the Frostyville Border die from Memory Box on both sides but with different toppers on each side
 

Then this is the middle of the card, again using the Kanban Christmas toppers.


And finally this is the back of the card when it is closed up for you to write on.  It is an insert taken from Crafter's Companion Jayne Nestorenko CD and sprayed with some Crafter's Companion Iridescent Spray and Sparkle.
 

I made a white box using Crafter's Companion Ultimate Pro and added a smaller snowman cutout from Kanban on the front of it.

My hairdresser seemed very pleased with it and I was surprised at how good it looked.

I'll do another blog later showing another of the commissioned cards.

Thank you for looking.  x

Wednesday, 5 December 2012

I don't believe it!!

Hello

It is 5 months since I last blogged here.  Where does the time go? 

I had just retired when I last posted and it took me quite a while to get the hang of retirement.   I found it quite demoralising not having any reason for getting up in the morning.  When I was working I felt I would give anything to be able to laze about but found it not quite so wonderful.  Anyway I'm getting more used to it but do sometime have my moments!!
 
I thought I'd show you that I haven't been completely lazy and have been fairly productive over the last 5 months.
 
In September I was in C & H Fabrics and saw some beautiful Advent calendar fabric panels there.  I fell in love with them and though what a good idea to make them for my six grandchildren!  After all I had plenty of time, hadn't I?  Not til I got them home did I realise that a) I was going to Spain in the middle of September and b) that my son was coming from Australia to visit me for a few days at the beginning of October and it would be ideal for him to take three of the calendars back when he left.  Oh dear what had I done?
 
Anyway despite never having done anything like this before, I managed to get three ready for Chris to take back for my Australian grandchildren and the other three ready for the beginning of December for my British grandchildren; and here they are:


I am very pleased with them and I think the children are too.  They were not difficult but very time consuming in that  each of the little pockets had to be sewn on separately.   Then I had to put wadding and back them with plain material.  I had never done that before, but I was able to make quite a professional job of them.  I left it up to my children to decide what to fill the pockets with!

So that's the first set of projects I have completed.  I will be back later to show some of the cards etc I have also been making over the summer.

Thank you for reading.  x